시작하기
-
QWhat is Creatorlink?
-
A
Creatorlink is a service that allows creators to create their own portfolio site for posting their work and share it with creators around the world.
Also, you can use the Creatorlink not just as a portfolio site, you can create a site for your business, marketing, eCommerce, and more.
-
QSigning Up for a Creatorlink
-
A You can sign up with your email address.1. Click the Get Started button
 2. Enter the Name, Email Address, and Password
 3. Check on the agreement of the Terms and Conditions and Privacy Policy
 4. Click Join Now button5. Go to your email account and verify your emailIf you have deleted your account or you cannot access your email account, please request us to change your email address (ID) to a new email address which you can access through 1:1 inquiry.
 -
QIs a Creatorlink service is free?
-
AYes, you can use a Creatorlink for free.Also, Creatorlink provides free website edit tools, free domain, free hosting, and more.If you need a premium feature like a custom domain, more storage, more traffic then you can upgrade your plan to premium whenever you want.
-
QCan I create and edit the website on mobile?
-
AEditing of the website is provided only in the PC version.So, you cannot access the edit mode on the mobile or tablet.Please use a PC for editing.
-
QAre there any browser limitations for using Creatorlink services?
-
AThe Creatorlink site is compatible with Google Chrome, Apple Safari, Mozilla Firefox, Microsoft Edge, and Internet Explorer (at least version 10). To use Creatorlink services smoothly, please choose one of the above browsers and update your browser to the latest version. (You may download the latest version for one of the above browsers, by using one of the links below).We recommend using the Google Chrome browser to edit your site for best performance.* Please note that the Internet Explorer service will be close on 08/17/2021.
-
QIs the site created by Creatorlink compatible with iPads or other tablets?
- AYes, all of the sites created by Creatorlink is support iPads or other tablets as the site is a responsive site. This means the site automatically adjusts the layout to fit all sizes of the screen.
-
QHow many sites can I create in one account?
-
AYou can create free websites up to 10 and you can create premium websites unlimited.For example) If you have 10 sites which are 4 premium sites and 6 free sites then you can still create 4 free sites more in your account.
-
QHow can I create a website?
-
A 1. Access to your Creatorlink account.2. Click the Create a New Site button
 3. Enter your domain ID4. Click Create button
 5. Select the template that you want to use
 6. Click the Edit This Design button
 7. You will access to Edit modeNow you can edit your website~ : )


편집모드
템플릿
-
QI want to create a site without using the provided template.
-
A If you choose the first time for your website1. Choose the Blank template on the template page
 If you want to change the template1. Click the Template on the footer of the Creatorlink site
 2. Choose the Blank template on the template page
 * Please note that when you change the template current data will be deleted and the new template will be replaced.
 -
QCan I use images provided in a template?
- AYes, you can use images used in a template. The images contained in Creatorlink templates are available for the public to use as all the image licenses are CC0 (CC Zero).
-
QCan I change my website template to another template design?
-
A If you want to change the template after creating the homepage, you can change the template on the template page.1. Click the Template on the footer of the Creatorlink.
 2. Choose the template that you want to apply.* Please note that when you change the template current data will be deleted and the new template will be replaced.* If you do not want to lose your current data then you can just add the block that was used on the other template in edit mode. All blocks of the template are provided on the block menu.
 -
QWhat happens to my website if I change the template?
- AWhen you change the template, current data will be deleted and the new template will be replaced. So please think carefully before changing the template.


메뉴 설정
-
QNavigation Settings Interface
-
A
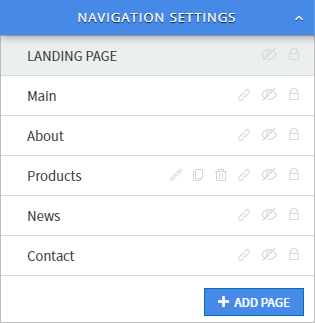 1. Add Page/Section(
 ) – Add a page or section for the site2. Edit(
 ) – Edit the menu name3. Copy(
 ) – Copy the menu with page/section* The contents of the forum block do not copy.* The block name and block settings do not copy.4. Delete(
 ) – Delete the menu with page/section. 5. Link(
 ) – You can add a link to the menu.You can find out more by clicking here (메뉴 링크 기능 안내)6. Invisible(
 ) – Hide a menu with page/section 7. Page Permission(
 ) – You can set the authority to access the pageYou can find out more by clicking here (메뉴 링크 기능 안내)
 -
QWhat is the Intro page?
-
A Intro page is the first page that shows when you access to the site.Also, you cannot delete the Intro page.
 If you make an intro page invisible, the first activate menu will be the first page of the site when you access the site.
 -
QHow do I change the position of the menu?
-
A 1. Click the Navigation Settings2. Click and drag the menu to the position that you want to move
-
QHow do I add a menu?
-
A1. Click the Navigation Settings2. Click the Add Page button3. Enter the name and click the Check button
-
QHow do I create a submenu?
-
A You can create a submenu at the Navigation Settings menu.[How to create a submenu]1. Click an Add a page button and create a submenu
 2. Drag the menu and over to the top menu
 3. The menu becomes a submenu
-
QHow do I change the menu name?
-
A1. Click the Navigation Settings2. Click the Edit icon on the menu3. Edit the menu name and click the Check button
-
QHow do I duplicate the menu?
-
A1. Click the Navigation Settings2. Click the Copy icon on the menu3. Check the duplicated menu has been created on the Navigation Settings
-
QHow do I delete the menu?
-
A1. Click the Navigation Settings2. Click the Delete icon on the menu3. Click the Ok button on the window* Please note that when you delete the menu, all contents in the menu also delete together.
-
QMenu Link Function
-
AYou can add 6 types of the link such as Default Link, URL, Submenu Link, Block Link(Anchor), File Download, and Used as a menu header(unclickable).1. Default LinkIt moves to its own page.* What is the own page?When you create a menu, it refers to the page that is automatically created for that menu.2. URLIt moves to the site that you entered the URL.3. Submenu LinkThis option is available when the menu has a submenu.It moves to the selected submenu page when you click the menu.4. Block Link(Anchor)It moves to the select block location.The block link option is only available if there is a block that enables the block link function.* You cannot move to the block that block is on the same menu page.5. File Download* You can download a file by clicking the link.* You can upload up to 10MB per file.6. Used as a menu header(unclickable)The menu is used as a folder that does not move anywhere.It is only available when it has sub-menu(s).* When you add a link to the menu, the menu page is hidden except the Default Link option.
-
QHow do I hide the menu?
-
A1. Click the Navigation Settings2. Click the Hide icon on the menu
-
QHow do I allow access to the page to only specific people?
-
A1. Click the Navigation Settings2. Click the Page Permission icon on the menu3. Choose the option and click the Ok buttonPublic – Everyone can access the pageOnly me – Only administrators can access the pagePassword – Only people who know the password can access the pageSite members only – Only the site member who are equal or higher than level that set

 )
) )
) )
) )
) )
) )
)


사이트 설정
-
QWhat is the One Page Style?
-
AInstead of viewing your site with many different pages, you can set your site to be a single page. This way, visitors can easily view many pages as one long page by scrolling.You can always switch between the One-page style and Multi-page style by turn on/off the One page Style option at the Site Settings menu.
-
QWhat should the resolution and size of a background image for my portfolio site be?
- AScreen size will vary depending on the device you are using (your image will respond or adapt its size to every device, unless you customize some code), but we suggest you use a 1920 x 1100 px image at 72 dpi (px = pixels, dpi = dots per inch).
-
QHow do I change the background image?
-
AFor website background color/imageYou can change your website’s background color/image by clicking the Site Settings > Background > Color/Image.For block background color/imageYou can change your block’s background color/image by clicking the Block setting > Basic > Background > Color/Image on the block.
-
QHow do I change default font of the site?
- AYou can set your default font at the Site Settings > Default Font.
-
QCan I use fonts for different languages?
-
A You can use fonts for nine different languages for your text.Supported Languages: English, Korean, Japanese, Thai, Arabic, Cyrillic, Hebrew, Chinese, Vietnamese1. Click the Edit Site in the dashboard2. Click the Site Settings > Default Font tab3. Click the Font option And Click the Add Language4. Select the languages that you want to use
-
Q Why does my website slow down after added the language fonts to my font list?
-
ASome of the langue font file sizes are large.So, when you add and use fonts that size is large, it makes your site loading slow.We recommend you use only necessary language fonts for your website.
-
QHow do I add background music?
-
A1. Click the Edit Site in the dashboard2. Click the Site Settings > Background Music3. Turn on the Use4. Click the Add Music to upload the music
-
QHow do I add the Popup?
-
A1. Click the Edit Site in the dashboard2. Click the Site Settings > Popup3. Turn on the USE4. Click the Add Popup to upload the popup image
-
QCan I change the position of the Popup?
-
AUnfortunately, you cannot change the Popup position.* Notice1. Default position of the Popup is center of the site2. You can add the Popup up to 3.3. If the total length of the three pop-up windows is longer than the width of the browser, the pop-up window partially overlaps.
-
QHow do I use the Button for Mobile feature?
-
AYou can use the Button for the Mobile feature when you upgrade your plan to a Business plan.You can add a maximum of 3 buttons at the bottom of the mobile screen.You can add links to each button such as make a call or link to the menu, map, other sites, or others.[How to set the button for mobile]1. Click the Edit Site in the dashboard2. Click the Site Settings > Button For Moblie[Button for Mobile Setting]1. ITEM NAME – Enter the name of the item2. Order – Change order of the item by dragging and drop3. View – Able/Disable the item4. Phone – Enter the phone number5. Link – You can add a URL Link / Menu Link / Block Link(Anchor)6. Icon – Choose the icon for the button.7. Background color –Choose the background color for the button. You can choose a more different color than default colors8. Apply – Apply the settings to the site9. Preview – You can check how your settings for the buttons look on the mobile
-
Q How can I protect my images and text from my website?
-
AYou can protect your images and text by turning on the Disable right-clicks option at the Site Settings menu. By enabling this option, users will not be able to right-click on your site.* Please note that this option does not guarantee 100% protection, as visitors can still take screenshots or view your site’s source code depending on the browser.
-
QCan I see my website as the desktop version on mobile?
-
AYes, you can see your website as a desktop version by using the Desktop Version for Mobile function.1. Go to Edit mode2. Click the Site Settings > Desktop Version For Mobile3. Turn on the function.4. Choose the default view for the site in mobile5. You can switch the view between the Mobile version and Desktop version by clicking the button at the bottom of the screen.
-
QCan I zoom in/out in the mobile browser?
-
AYou can zoom in/out in mobile browser by using the Mobile Zoom option.1. Click the Edit Site in the dashboard2. Click the Site Settings > Mobile zoom tab* The Mobile Zoom function may not work depending on the mobile browser setting or policy.
블럭
-
QWhat is a “Block”?
-
AA block is a basic element to build your site (a building block). You can add, delete, or rearrange blocks to easily create your site.Create a fabulous website using more than 1,000 different types of blocks provided by Creatorlink : )
-
Q How do I change the settings for the block?
-
AEvery block has the Block Settings icon on the block's right top sides. The Block Settings window will be pop up when you click the Block Settings icon.And you can change the settings on the Block Settings window.
-
QHow do I add a block?
-
A1-1. The Add Block Here icon will be displayed at the top and bottom sides of the block.* If you click the top side Add Block Here icon of the block, the block is inserted above the block.* If you click the bottom side Add Block Here icon of the block, the block is inserted below the block.1-2. If the page is empty, you can click the empty block area.2. Select the type of the bock3. Select the block design4. Click the Apply button
-
QHow do I duplicate the block?
-
A1. Click the Block Setting icon on the block2. Click the Duplicate button on the block setting* The Form block does not support the Duplicate feature.* When you duplicate the Gallery or Forum block, the content is not duplicated.
-
QHow do I change the block location?
-
A1. Click the Block Setting icon on the block2. Click the Reorder button3. Click and drag the block to the place you want to move4. Click the Save button
-
QHow do I delete a block?
-
A 1. Click the Block Setting icon on the block2. Click the Delete button3. Click the OK button to delete the block* You can restore the deleted block by using the Undo feature.* Please note that you cannot restore the forum data. So please think carefully when you delete the forum block.
-
QHow do I delete a block?
-
A1. Click the Block Setting icon on the block2. Click the Hide button
-
QHow do I change the padding of the block?
-
A1. Click the Block Setting icon on the block2. Click the Padding3. Set the padding as you want* Please note that you can set the padding value with px only for Top and Bottom* You can apply the Left & Right padding by turn on the option.
-
QWhat is the Block Link(Anchor)?
-
AThe Block Link is a link that makes you move to the specific block.You can use any block to be a block link except the menu and footer block.
-
QHow do I add a Block Link?
-
A1. Click the Block Setting icon on the block2. Click the Block Name/Link(Anchor)3. Turn on the Block Link and change the Block Name for easy to recognize4. Click the Link icon on the element (Text, Image, Menu, etc.)5. Select the Block Link(Anchor) and choose the block to move
-
QHow do I edit the Advanced setting of the block?
-
A
1. Click the Block settings icon on the block
2. Click the Advanced tab
3. Edit the settings
메뉴
-
QHow do I set the logo?
-
A You can set the logo at the block settings of the block that has the logo.[Image Type]1. Logo Type : You can select the logo type between the Image and the Text2. Image : You can change the logo image3. Size(height) : You can set the height value of the logo image. The width ratio value also is changed as the height value changee.g.) If the image size is 100px X 30px and change the height to 60, the width change to 200.3. Original : Use the original image size or ratio[Text Type]1. Logo Type : You can select the logo type between the Image and the Text2. Text : Enter the text for the logo3. Logo Color : You can change the logo text color4. Logo Font : You can change the font type of the logo text5. Logo Size : You can change the font size of the logo text6. Line Spacing : If you have multiple lines of the logo text, you can adjust the line spacing
-
QHow do I change the Menu block design?
-
A 1. Click the Block Setting icon on the block2. Click the Change Menu Design icon3. Select the Menu block design and click Apply button
-
QHow do I change the logo to text type?
-
A 1. Click the Block Settings icon on the block2. Click the Text button on the Logo Type3. Enter the logo text on the Text input box4. Click to Save button to apply
-
QHow do I adjust the size of the Logo?
-
A 1. Click the Block Settings icon on the block2. Adjust the logo size by moving the slider on the Size/Logo Size
-
Q What is the Mobile Optimized Design function?
-
A When you use the Mobile Optimized Design function, the mobile menu will be shown with a mobile-optimized preset. If you want to use the same setting with your PC menu setting, turn off the Mobile Optimized Design function.1. Click the Block Setting icon on the block2. Turn off the Mobile Optimized Design function
-
QI do not have a Color Settings option on my Menu block settings.
-
A
Your menu block is the older version if you do not have a Color Settings option on your Menu block settings.
To upgrade your menu block, you can use the Change Menu Design function to apply the new version of the menu block.
-
QHow do I change the menu font color and menu background color?
-
A 1. Click the Block Settings icon on the block2. Click the Menu Font option3. Click the Color Settings icon4. Set the menu font color and menu background color
슬라이드쇼
-
QWhy is the image on the slideshow block cropped?
-
AThe slideshow block has two types which are “Background Image Type” and “Standard Type”.The Background image type is the image shown to be covered without spaces on the block. So the part of top/bottom or left/right side of the image may crop when you reduce the display size. The background image type shows the notice when choosing the background image type of the slideshow block on the block list.The Standard slideshow block has a margin and an image display with the original image size.The standard slideshow block does not crop when you change the display size, as the image shows the entire image in any size of the display. Please use a standard slideshow block if you want to show an entire image in any display size.
-
QHow do I control the slide delay time?
-
A1. Click the Block Settings on the Slide Show block2. Click the Advanced tab3. Click the Slide Delay Time4. Change the delay Time* Slide delay time is in milliseconds and can be set from 0 to 10,000 milliseconds(ms).5. Click the Save button
텍스트
-
QText Editor Interface
-
A[How to active the Text Editor]1. Click inside of the text box on the block2. Drag the text
-
QIs there a limit to the amount of text I can enter on a page?
-
AThe text that can be entered in text area like 30,000 characters in English and 15,000 characters in Korean per block.Entering the text will be restricted when you entered the text over the limit.
-
QHow do I add a link to the button?
-
A1. Click the text area2. Drag the text are to add a link3. Click the Link icon on the Text Editor tool4. Select the link to add and click Ok button to apply
-
QHow do I edit the text in the button?
-
A1. Click the text area in the button2. Enter the text3. Click the outside of the button
-
QHow do I make a link to open in a new window?
-
A1. Click the text area2. Drag the text to add a link3. Click the link icon on the Text Editor tool4. Select the link option and check on the Open in a new window option
-
QCan I add a font that I want to use on the font list?
-
AThe fonts that provides from Creatorlink are CC0 license which can be used for commerce. So, you cannot add a font that you want to use by yourself.If there is a font that you want to add to our font list, please check the font has a CC0 license and find a font that you want to use at the Google Font site first. And if the font has a CC0 license and available on the Google Font site, we can consider adding a font to our font list.
-
QCan I move the text box to other location?
-
AUnfortunately, you cannot move the text box to any location that you want.The text boxes are fixed its location cause it optimized to the responsive website for the best view on any device.
-
QHow do I make users can download a file by clicking the menu, text, or image?
-
AThere are two ways that you can let users download your file.[Using the File Download option]1. Click the link icon on the menu/text/image2. Select the File Download option and click the Attachment button3. Upload file to be download4. Select the File and click to Use button5. Click Ok button to apply[Using the hosting or cloud service]1. Upload a file to the other hosting or cloud service (Google Drive, Dropbox, etc..)2. Copy the sharing URL of the file3. Go to the edit mode in Creatorlink4. Click the link icon on the menu/text/image5. Select the URL option and paste the URL of the file that you copied on #26. Click Ok button to apply
이미지
-
QHow do I add or change the image?
-
A[How to change the image]1. Move your cursor over the image2. Click the Image icon3. Select the image and click the Use button[How to add an image]1. Click the Block Setting icon on the block2. Click the Add button3. Select the image and click the Use button
-
QDoes the image capacity have a limit?
-
AThe site has a storage capacity, and storage capacity is different depending on the plans.(Free : 200MB, Basic: 10GB, Business: 30GB)You can upload a maximum of 10MB per file.
-
Q Why is the image on the site shown broken?
-
AIf you delete the image on the Image library, it also deletes the image on the website.So please think carefully when you delete the image on the image library.
-
QCan visitors download or print images from my site?
-
AVisitors can download images arbitrarily through HTML code, but Creatorlink prohibits visitors from using, distributing, or modifying images uploaded by users without permission.If you need a copyright mark on your work, please upload it by inserting a watermark using an image editing program.
-
QCan I upload large images?
- AIf you need to adjust the size of an image, we advise you to use photo editing software, such as Adobe Photoshop. After adjusting the size of an image using such software, you may be able to upload it (uploaded images need to be less than 10MB (megabytes) in size).
-
QHow do I change the image size on the block?
-
AYou can change the size of the image by using the Change Aspect Ratio option on the block settings. (Except the Slideshow block and Gallery block)1. Click the Block Setting icon on the block2. Select the image that you want to change on the Contents List3. Click the Change Aspect Ratio icon4. Select the ratio you want to change
-
QCan I create a logo at the Creatorlink?
-
ACurrently, there is no feature in Creatorlink to create your own logo. We suggest using an external site to design your logo for free.(When you upload your logo, remember to upload it as a PNG or JPG file for better quality, unless it has a lot of solid colors. Then a GIF file will do).
-
QWhat kind of file types for images can be uploaded?
-
AYou can use any of the file types (Jpeg, Gif, PNG) supported for images on Creatorlink.We recommend you use a jpeg file type for your site if possible. The jpeg file type has a small image size and good quality. So it helps you to improve your site loading time.
-
QWhat is the function of the small icons in the image block setting window?
-
A
Depending on the block you're using, the available options and icons will differ.
The following diagram explains what each icon is for.
-
QWhy can I not upload an image?
-
A Please check if the image satisfies the following requirements.- a JPEG, PNG, or GIF file- less than 10MB (megabytes) in size- the image's filename does not contain any special charactersIf the image satisfies the above requirements and you still cannot upload it, then you might have a problem with a setting on your computer or internet connection.Please try the following steps to resolve this problem:- Try uploading a different type of image (supported by Creatorlink)- Clear your browser's cache and try uploading the image again- Sign out from your account, sign in again, and try uploading the image again.If one of the above solutions does not resolve the problem, please leave a question at the 1:1 Q&A.
-
QHow do I add a link to an image?
-
A 1. Move your cursor over the image.2. Click the Link icon.3. Select the link and click Ok button to apply.
갤러리
-
QWhat‘s the difference between the image type and Project type of the gallery?
-
AImage Type : This is a gallery type that displays the image according to the original size or screen size when clicking on a thumbnail.The is the best type for focusing on the image.Project Type : This is a gallery type that shows more details on a separate page when clicking on a thumbnail.This is the best type for showing more about the image with more text, image, video, and others.
-
QManage the Content Interface
-
AImage / Project1. Gallery List : It shows all Gallery blocks as a list, and you can select the Gallery to edit the contents.( - Image Gallery, - Project Gallery)2. Close : Close the Gallery Management.3. Add : Add the contents on the Gallery.4. Category : You can turn On/Off the category. You can see the contents by category. You can edit the category by clicking the setting icon( )5. List Views : You can see the contents by 30, 50, or 1006. Contents List : Shows the contents in the Gallery. You can edit the contents.
-
QHow do I edit the contents?
-
AImage TypeProject Type1. EditImage type : you can edit the contentsProject type : you can edit the contents and project page2. Duplicate : duplicate the contents3. Move : move the contents to the front of the list or end of the list* You can move the contents by dragging.4. Category : Add or remove the contents to the category* You can add content to multiple categories.5. Link : Add a link to the contents6. Invisible : Make contents invisible7. Transfer : Transfer the contents to another gallery8. Delete : Delete select contents
-
QHow do I change the block name in Content Management?
-
A 1. Click the gallery list on the left top side of the content management2. Move the cursor on the gallery you want to change the name3. Click the edit icon (
 )4. Change the name as you want5. Click the Check button to apply6. The block name has been changed
 -
QHow do I upload many images at the same time?
-
A1. Click the block setting icon( ) on the block2. Click the Manage the Content3. Click the Add button4. Select the images by dragging or select the images by holding down a Ctrl key* Slideshow block, Contents block, and image block can upload one image each time
-
QHow do I transfer the image to another gallery block?
-
A1. Select the content on the Contents Management2. Click the Transfer button3. Select the gallery on the list and click OK button* Also, you can choose to stay in the current gallery or go to the selected gallery after moving the contents
-
QHow can I show gallery contents by category?
-
A[Block Setting]1. Click the block setting button on the block2. Turn on the Category option at the Advanced > Category.3. Edit the category settings as you want4. Move your mouse over the image and click the Edit( ) icon5. Select the category and click the OK button[Content Management]1. Turn on the Category function2. Click the Category Setting icon3. Edit the Category items4. Select the contents5. Select the Category option and apply the category
-
QHow do I add more categories to the gallery?
-
A[Block Setting]1. Click the Block Setting icon on the block2. Turn on the Category option at the Advanced > Category.3. Click Edit icon on the Items4. Click Add button5. Enter the name of the Category6. Click Check button7. Click OK button[Content Management]1. Turn on the Category function2. Click the Category Setting icon3. Click the Add button4. Enter the name of the Category5. Click the Save button
-
QHow do I duplicate the content of the gallery?
-
A 1. Select the content on the Content Management2. Click Duplicate button3. Click OK button* If you duplicate the content that added a block link, the content is duplicated without the block link.
-
QCan I use regular blocks on the project page of the gallery?
-
AYou can use the basic type of the Text, Divider, Image, and Video block for the free and basic plan.If you are using the Business plan, you can also use the Slideshow, Title, Contents, Text, Image, Video, Divider, Social, and Others(Countdown) blocks.
-
QHow do I move to another content project page directly?
-
AYou can move another content project page directly if you are using the Bottom List function.1. Click the Block Setting icon on the block2. Turn on the Bottom List functionYou can find the Gallery list at the bottom of the project page.
-
QHow do I pin the specific blocks to every project page in the gallery?
-
AYou can pin the specific blocks to every project page in the gallery by using the Pin function.Conditions to pin the block1. There must be more than 2 normal blocks in the project page(The pinned blocks are not counted)2. The block must be located at the top or bottom of the body area, or the block must be under the pinned block or above the pinned block.Before pinned the blockAfter pinned the block
-
Q How do I hide the Comment, Social Share, and Bottom List on the project page?
-
A1. Click the Block Setting icon on the block2. Turn off the Comment, Share, or Bottom List function
-
QHow do I change the gallery layout?
-
AMost of the gallery blocks can change the gallery layout by using the Layout feature.You can set the Type, Number of Contents in a row, Space between contents, and Content height.1. Click the Block Settings icon2. Click the Layout3. Set the layout options
-
QHow do I change the gallery design?
-
ACreatorlink provides a variety of gallery designs. You can always change your gallery design without losing your content data using the Change Gallery Design function.1. Click the Block Setting icon on the block2. Click the Change Gallery Design function3. Select the gallery design and click the Apply button
-
QHow do I show the products only for the members? (For Korean version only)
- AThis option is only available for the Korean version.
 )
)게시판
-
QHow do I change the forum design?
-
A1. Click the Block Setting icon on the block2. Click the Change Forum Design icon3. Select the forum design and click the Apply button* The forum design will be applied to the published site when you publish the site.* You can only change the design with the same type of forum.
-
Q How do I recover the data of the forum after I deleted the forum?
-
AThe data will permanently delete when you delete the forum block. So, you cannot recover the data once you deleted the forum block.Please think carefully when you delete the forum block.
-
QHow do I change the permissions for a forum?
-
A1. Click the Block Setting icon on the block2. Click the Advanced > Management3. Change the permission for each settingAdmin : Only admin has permission to read/write postsAll : All users have permission to read/write posts (including guests)Members : Only Creatorlink members have permission to read/write postsNonmembers : Only nonmembers have permission to read/write postsGroup : Only members of a specific group have permission to read/write posts
-
QHow do I write a post on the FAQ forum?
- AOnly the admin can write a post on the FAQ forum in the Edit mode. On the published site, you can only read posts.
-
QHow do I change the order of the posts of the FAQ forum?
-
A1. Click the Block Setting on the block2. Click the Advanced > Change the order of posts icon3. Change the order of posts and click Save button
-
QWho can read a private post?
-
A It depends on the writer who writes a private post can read a private post.- If admin write a private post : Only admin can read a private post- If a member writes a private post : Only admin and member who write a private post can read a private post- If nonmember write a private post : Only admin and nonmember who knows the password for the post can read a private post
-
QHow do I set the private post?
-
A1. Click the Block Setting button on the block2. Click the Advanced > Other Settings3. Set the Private PostsDisabled : Not provide the private post option when writing a postEnable : Provide the private post option when writing a postAlways enabled : Only can write a private post
-
QHow can nonmembers check private reply posts for their posts?
-
AThe nonmembers can check the private reply posts after authorize themselves through the password confirm window.[If the nonmember post is a private post]1. Click the private post that nonmember write on the forum list2. Enter the password on the Password window and click OK button3. Go back to the forum list4. Click the private reply post[If the nonmember post is not a private post]1. Click the private post that nonmember write on the forum list2. Click the three dots icon on the right top side of the post3. Click the Modify button4. Enter the password on the Password window and click OK button5. Go back to the forum list6. Click the private reply post
-
QWhat is a Group in forum management setting?
-
AYou can create a group with specific members. You can give permission only to the group.1. Click the Block Setting icon on the block2. Click the Advanced > Management3. Click the Groups Setting icon4. Edit the group like add a group, add a member, delete a member/group, and more* If you are using the Business plan and using the membership, you can add your site member to your group. If you do not use the Business plan or not using the membership, you can add Creatorlink members to your group.
-
QHow do I move to another post in the post?
-
A1. Click the Block Setting icon on the block2. Click the Advanced > Other Settings3. Turn on the Bottom List functionYou can see the forum list at the bottom of the post
-
QCan I be notified by E-mail when a post is written on the forum?
-
A 1. Click the Block Setting icon on the block2. Click the Advanced > Send To3. Turn on the Use* If you do not want to receive an E-mail notification, you can always turn off the option to not receive an E-mail notification.
-
Q How do I show only some of the forum items?
-
A1. Click the Block Setting icon on the block2. Click the Advanced > Item/Color Settings3. Click the Items to enable the item or disable the item* FAQ forum does not support the Item Settings
-
QHow do I change the color set?
-
AYou can choose the color set between the black and white.1. Click the Block Setting icon on the block2. Click the Advanced > Item/Color Settings3. Choose the color set
-
QHow can I set pre-populated text into the description field?
-
ABy setting the pre-populated text into the description field, you can induce users to follow the rules or fill out the form.* FAQ forum does not support the description filed function.1. Click the Block Setting icon on the block2. Click the Advanced > Description Field Setting icon3. Enter the pre-populated text into the description field4. Click the Ok button to apply.
-
QHow do I show the recent posts on the forum?
-
AYou can show the recent posts by using the Latest block.[Forum Block]1. Click the Block Setting icon on the block2. Click the Block Name/Link(Anchor)3. Change the name as you can easily recognize[Latest Block]4. Click the Block Setting icon on the block5. Click the Add button6. Select the Forums7. Click Ok button to apply
동영상
-
QHow do I add a video on my website?
-
A You can add two types of video blocks to your website. To upload a video, you need a video platform URL (Youtube, Vimeo, GfyCat, etc..) or a file URL uploaded on the hosting to add video on the video block.[Basic Video Block]The basic video block type is the video play when you click the play button on the block.Support Video Platform: Youtube, Vimeo, Soundcloud, etc..1. Go to the video page on the video platform2. Copy the URL of the video3. Go back to Edit mode of the Creatorlink4. Click the block setting icon on the video block5. Paste the copied video URL on the input box[Background Video Block]The background video block is the video that keeps playing without sound on a PC. But in mobile, it shows the preview image instead play the video.1. Using the video file on the hosting- Supportable Video File Format: MP4- Please make sure the “.MP4” must include on the Video File URL when you use the video file from the hosting.e.g. https://creatorlink.net/resource/video/sample/bgvideo-2.mp42. Using the Gfycat(www.gfycat.com) service1) Access to the Gfycat (링크 : www.gfycat.com)2) Click the Upload button3) Upload your video4) Copy the video URL5) Go back to Edit mode of the Creatorlink6) Click the block setting icon on the video block7) Paste the copied video URL on the input box
-
QWhy doesn’t my background video play in some browsers?
-
AIf you use the hosting video URL for background video block, some browsers (such as IE) do not play the video as the browser does not support the Webm video format.* Internet Explorer browser will be terminating the service on Aug 17, 2021.
-
QWhat are the video requirements for a background video block?
-
AResolution - 1920 x 556File Format - MP4(.h.264)webm(IE does not support this format)Length - less than 15 secondsFrame rate - 15 - 30 frames/secondSize – about 3 MB
-
QWhat is a preview image?
-
AMobile devices do not fully support playback of background videos, due to complications such asdifferent browser support of video file types. Therefore, we decided to use a preview image to replace a background video, and display as a background image.(Don't forget that a preview image will also display while a video is loading.)You'll need to upload your own preview image (otherwise the previously used image will be used).
소셜
-
QHow do I add a social media feed to my website?
-
AYou can add your Instagram or Twitter feeds on your website by using the feed type of social block.1. Click the Advanced > Connected Social Accounts on the dashboard2. Click the Register of the Instagram or Twitter3-1. Enter the Twitter id3-2. Log in to your Instagram account and accept the permission4. Go to the Edit mode and add the Social Feed block on your page5. Click the block setting icon6. Turn on the social feeds* When you click the "Go To Social Accounts Setting >", the "Advanced" page will open in a new tab.
-
QWhy I can’t see my latest social posts on my site?
-
AEach social media service takes some time to upload new posts to their servers, which can later be fetched as a feed.This process usually takes a few minutes. After that, you’ll be able to read your latest posts on your site.
-
Q How do I change the connected Instagram account on the social feed block to another Instagram account?
-
A1. Click the Advanced on the admin page2. Delete the Instagram account on the Connected Social Accounts3. Access to the Instagram site on the same browser4. Log out the Instagram account5. Log in with new Instagram account6. Go back to the Advanced > Connected Social Accounts7. Click the Register8. Click Allow button on the Instagram permission window
컨택트
-
QHow do I display my location using a map block?
-
A You can display your location using a Google Maps URL.1. Go to the Google Maps(maps.google.com) site2. Search your location3. Copy the URL from the address bar in the browser* Short URLs are not supported4. Go to Edit mode of Creatorlink5. Click the block setting icon on the map block6. Paste the copied URL on #3 on the input box7. Click the Save button
-
QWhy is my map displaying the wrong location or not displaying at all?
-
AWhen you directly copy the URL after searching the location from Google Maps and paste it in the block settings window for your map block, it will display the right location. However, if you copy the URL after doing any of the following actions, the location data is changed, and your map block might display a different location.- Zoom in/out using a mouse wheel : It shows the different location- Move the center of the map : It shows the different location- Move the center of the map and zoom in/out using a mouse wheel : The map does not display properly- Use the Short URLs : The Short URLs are not supported.
-
QHow do I set the email for the notification of the Contact block?
-
A1. Click the Block Settings icon on the block2. Click the Setting icon on the Basic > Send To3. Enter the email address on the input box and click the Add button[Recipient E-mail]1. Input box : Enter the email address to add2. Add : Add the entered email address in the input box* You can add an email address when you use a premium plan for the site3. List : You can see the added email address4. Edit : Edit the email address5. Delete : Delete the email address6. Close : Close the Recipient E-mail window
폼
-
Q How do I edit the Form block?
-
A 1. Click the Block Setting icon on the Form block2. Click the Setting icon on the Form Config3. Edit the form items[Form Editor]
 a. Form Name : You can edit your form name.b. Title : Enter or edit your question titlec. Item type : You can use 9 different item types.(Short answer, Paragraph, Single choice, multiple selections, Dropdown, Date, Date and Time, File Download, File Upload)d. Item Description : Add a description about your question.e. Item Description On/Off : You can turn on/off the description.f. Item Options : The option list for Single Choice/Multiple Selection/Dropdown.g. Add Option : Add extra option for the list.h. Required : Make an item required.i. Delete : Delete the item.* When you delete the item, the received data also will be deleted. Please save the data as Excel file before delete the items if you need them.j. Add Item : Add a new item on the form.k. Title Font : Change the title font style.l. Description Font : Change the description font style.m. Confirmation Message : You can change the confirmation message.n. Send to : You can edit the email address to receive the notice when you get responses.o. Privacy Policy : You can insert your own privacy policy for your form.p. Privacy On/Off : You can turn on/off to use the privacy policy.q. Done : Exit the form configuration window.
 -
QHow do I check the received message from the Form?
-
A1. Click the Form button on the Alert table on the dashboard2. Click the Response button on the Block setting of the Form block in the edit mode3. Click the Title of the Form4. Check your received messages
-
QCan I save the received form data as Excel file?
- AYou can download the data by clicking the Excel button at the right top side of the form data table.
-
QHow do I delete the received message of the Form?
-
AYou can delete the received message by clicking the Delete icon.* If you delete the data, the data delete permanently, and you cannot restore it. Please, if you need data, back up the data before the delete.
-
QHow do I set up the Email address for the notification message of the Form?
-
A1. Click the Block Setting icon on the Contact block2. Click the Setting icon on the Form Config field3. Click the Setting icon on the SEND TO field[Email Setting Window]1. Field : Enter the Email Address that you wish to add.2. Add Button : Add the entered email address.* Only premium plan users can add more email addresses.3. List : List of the email addresses to get the notice messages.4. Edit : You can edit the email address5. Delete : Delete the email address from the list.6. Close : Close the Email Address window.

기타
-
QHow do I change the Countdown date from Countdown block?
-
A1. Click the Block Setting icon on the Countdown block2. Click the Select date box on the Countdown Timer3. Select the date
저장 / 게시
-
QAbout Menu toolbar in the edit mode
-
A1. Navigation Settings : You can add, delete, edit, copy, link, visible/invisible or set permission about the menu2. Site Settings : You can set the various settings about the site such as the One-page style, Background, Default font, Background music, Popup, the button for mobile, Disable Right-clicks, Desktop version for mobile or Mobile zoom3. Undo : You can undo the steps and restore the data. Please note that the Undo is available only last 15 steps.4. 1:1 Q&A : You can always ask a question through 1:1 Q&A5. Guide : You can learn how to use the edit mode6. Preview : You can check how your site looks and works without publish your site7. Publish : You can update the edited contents to the published site8. Close : Close the edit mode. The edited contents are saved in edit mode and not updated to the published site.
-
QHow to update the edited contents to the published site?
-
AYou can update the site by clicking the Publish button in edit mode.The edited contents do not update to the published site until you click the Publish button.
-
QHow do I unpublish the site?
-
AYou can click the On/Off button to publish/unpublish the site on the dashboard.If you want to unpublish the site, turn off the button.
-
QHow do I edit the site without affecting the actual site?
-
AThe edited contents are automatically saved and not be updated to the published site until you click the Publish button.Please note that this is a useful function when renewing or updating the website.
요금제
-
QWhat is a Premium plan?
-
AWhen you upgrade your plan, you can use various features for smooth website management and built branding for your website.Premium plan provides more storage space and traffic, Domain Connection, Favicon, remove Creatorlink brand, and more...
-
Q Is there a discount for annual payment for the Premium plan?
- AYes, we offer a 20% discount for 12 months and a 30% discount for 24 months.
-
QHow can I upgrade my site?
-
A1. Click the Upgrade button on the admin page2. Click the Select button on the plan you want to be upgraded3. Select a Plan Length4. Review details and select the payment5. Click the Subscribe button to pay* A premium plan only applies to one site. To upgrade multiple sites, you may purchase and apply premium plans per site.* Premium plan will automatically renewal the subscription when you purchase with credit card. If you do not want automatic renewal, please uncheck the automatic renewal option from manage premium plan page.
-
QHow can I cancel my Premium plan?
-
AYes, you can request to cancel your plan through a 1:1 inquiry.You can get a full refund within 7 days from the day you subscribe to the plan. But if you have over the 7 days from the day you subscribe to the plan, you can get a refund by the following the calculation.Total refund = Total payment – Penalty fee – used months price* Penalty Fee: The Penalty fee is a 30% price of the total payment, including an initial setting fee and other services for premium plans.
-
Q What happens to my Creatorlink site if I cancel my premium plan?
-
AOnce you cancel your premium plan, all premium features will be removed from your site, and space storage and bandwidth will be downgrade to basic capacity. The images you used in previous work will be preserved, yet there may be some restriction on the data and others if you exceed the usage of basic capacity.
-
QHow do I pay for my Premium plan?
- AYou can purchase a Premium plan by PayPal.
-
Q Can I switch my Premium plan from one site to another?
-
AYes, you can switch your premium plan to another website that does not use a premium plan.Once a premium plan has been removed from a site, a site will lose all premium services.1. Go to Manage Premium Plans page* Click the Plan button on the Admin page* Click the Premium Plans menu on the right top side menu on the Admin page.2. Click Switch Plan button3. Select a site to apply a premium plan.* Only sites which does not applied premium plan are available.
-
QHow can I turn off the auto renewal for premium plan?
-
A1. Go to Manage Premium Plans page* Click the Plan button on the Admin page* Click the Premium Plans menu on the right top side menu on the Admin page.2. Uncheck the Automatic Renewal option from your applied plan.If you want to turn on the Automatic renewal option again, just check the option again.
-
QHow can I get a tax invoice after paying my bill?
- AThe tax invoice is only available for users who live in South Korea when they paid a virtual account.
-
QCan I re-issue the cash receipt?
- AThe cash receipt is only available for users who live in South Korea when they paid a virtual account.
-
QCan I get a cash receipt by email?
- AThe cash receipt is only available for users who live in South Korea when they paid a virtual account.
-
QCan I re-issue the cash receipt?
- AThe cash receipt is only available for users who live in South Korea when they paid a virtual account.
-
QHow do I downgrade the premium plan?
-
AUnfortunately, you cannot downgrade the premium plan. If you want to use a lower premium plan, you need to disconnect the premium plan from the site and subscribe to the premium plan again.
SEO/마케팅
-
QWhat are meta tags?
-
AA meta tag is a tag that is located in the head section of an HTML document (i.e. between and, found at the top of a web page’s source code. The content in these tags aren’t visible, but they contain important information about your site.Simply, the data in meta tags allow a browser or search engine to gather information about a site and use it.The standard meta tag structure and an example are as follows:<meta name="title" content="Creatorlink"></p><meta name="author" content="Creatorlink"></p>Choose the type of metadata for the name attribute, and the content of your chosen type of metadata for the content attribute.Now, you are able to enter information about your site according to your specific needs and circumstances.
-
QHow can I edit the meta tag?
-
A1. Log in to the Creatorlink2. Click the Advanced3. Click the Edit icon on the Meta Tag4. Edit the Meta tags5. Click the Save button
-
Q Which meta tags are provided and can I add more tags?
-
AThe author, title, description and keyword types are default meta tags in your site. You can add extra new meta tags by clicking Add Tag button.The following Meta tags are examples that you can add to your site.subject : Website Subjectpublisher : Name of Organization or Company who created the siteowner : Name of person in charge of sitedate : Created datedistribution : Distributorcopyright : Copyrights
-
QWhat is the Favicon?
-
AThe Favicon is a logo that shows with the browser title on the Browser tab.The Creatorlink logo is set as a default favicon.
-
QHow do I change the Favicon?
-
A1. Click the Advanced on the admin page2. Click the Favicon icon on the Basic Info3. Upload the favicon image* We recommend you to use 256x256 size in PNG format.* To change the Favicon image, you need a premium plan for your site.
-
QWhat is my sitemap URL for my creatorlink site?
-
AYour sitemap URL is as follow:https://siteid.creatorelink.net/user-sitemaphttps://DomainURL/user-sitemape.g.) https://jdportfolio.creatorelink.net/user-sitemaphttps://example.com/user-sitemap* The site id is the Id when you create a site URL.* You can also find the sitemap URL on the Marketing tab on the Admin page.
-
QHow to submit your website to Naver webmaster tools
-
A To get your website on the Naver search results, you have to submit your website to Naver webmaster tools.1. Go to Naver Search Advisor (URL : https://searchadvisor.naver.com/)2. Click the Webmaster Tools button
 3. Type in your website address and then click the submit icon on the right side of the bar* If you are adding your custom domain, you must add the “https://” and type the domain URL without “www”Example) http://www.abc.com (X)https://abc.com (O)
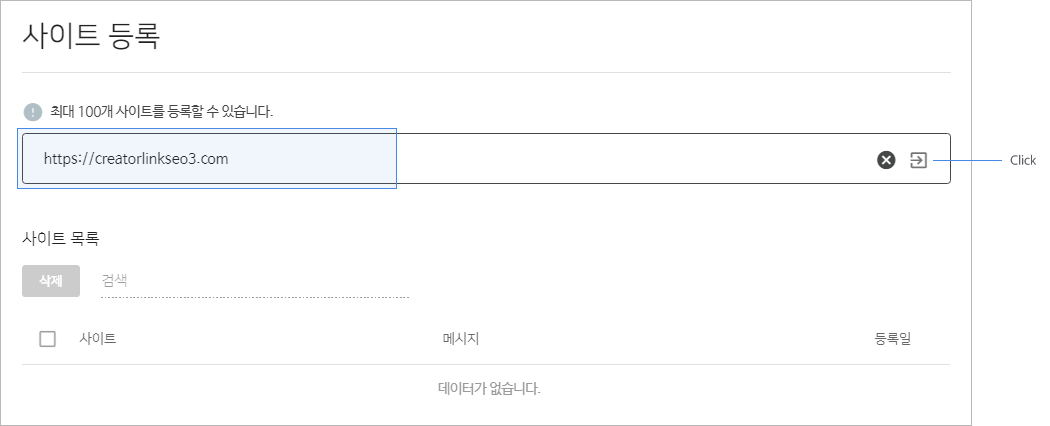 4. Select the “HTML Tag option” and copy the value of the content of the meta tag* You can only verify your website with HTML Tag option
 5. Open the Creatorlink site with a new tab6. Click the Register button at the Marketing > For Search Engines > Naver Webmaster Tools on the dashboard7. Paste the value that copied on step 4 and click the OK button(Please use your own values of the meta tag and do not use the values on the image as they are just sample.)
 8. Go back to the webmaster tools page and make sure the HTML Tag option has been selected9. Click the Verification button to verify your websiteAfter complete to verify your website, you also need to submit the sitemap to the webmaster tools.[How to submit the sitemap]1. Click the site URL on the site list2. Click Request > Submit Sitemap3. Type the “user-sitemap” in the box
 4. Click OK buttonNote* It might take a maximum of 14 days to get your site from the Naver search result.* By search with “site: URL”, you can check whether your site is indexed or not indexed by the Naver search engine* Edit the meta tag or add webmaster tools on your site are premium features. So, if your plan has changed to the free plan, some of the meta tags are replaced with the default text and webmaster tools are disabled. But when you upgrade to the premium plan again, it will restore your data, and able to use the webmaster tools* Please note that the portal site does not guarantee to index all registered site as the search engine algorism filtered the lower quality of the contents or as their policy* If you have more questions about the webmaster tools or about searching on the Naver, please ask via Naver customer center
 -
QHow to submit your website to Google Search Console
-
A To get your website on the Google search results, you have to submit your website to Google Search Console.1. Go to Google Search Console2. Click the SEARCH CONSOLE button3. Sign in to Google4. If you already have a property on your Google Search Console, click Add property on the property list5. Type in your site URL at the URL prefix and click the Continue button* If you are adding your custom domain, you must add the “https://” and type the domain URL without “www”Example) http://www.abc.com (X)https://abc.com (O)6. Click the Copy button at the HTML tag7. Open the Creatorlink site with a new tab8. Click the Register button at the Marketing > For Search Engines > Google Search Console on the dashboard9. Open the notepad program or other word program.10. Paste the copied meta tags on the document and then copy only the value of the content11. Paste the copied value of the content on the box and click the OK button(Please use your own values of the meta tag and do not use the values on the image as they are just sample.)12. Go back to the Google Search Console page and then click the VERIFY button at the HTML tagAfter complete to verify your website, you also need to submit the sitemap to the webmaster tools[How to submit the sitemap]1. Go to Google Search Console and select the site from the property list.2. Click the Index > Sitemaps3. Type in the “user-sitemap” and click the SUBMIT button3. Sitemap has been submitted제출된 사이트 맵 목록에 user-sitemap 행 전체를 범위 지정하여 강조 효과 + ‘제출완료’ 문구 삽입.Note* It might take a maximum of 14 days to get your site from the Google search result.* By search with “site: URL”, you can check whether your site is indexed or not indexed by the Google search engine* Edit the meta tag or add webmaster tools on your site are premium features. So, if your plan has changed to the free plan, some of the meta tags are replaced with the default text and webmaster tools are disabled. But when you upgrade to the premium plan again, it will restore your data, and able to use the webmaster tools* Please note that the portal site does not guarantee to index all registered site as the search engine algorism filtered the lower quality of the contents or as their policy* If you have more questions about the webmaster tools or about searching on Google, please ask via Google customer center
-
QHow to submit your website to Bing Webmaster Tools
-
A To get your website on the Bing search results, you have to submit your website to Bing webmaster tools.1. Go to Bing Webmaster Tools2. Type in your site URL at the Add your site manually and click the Add button* If you are adding your custom domain, you must add the “https://” and type the domain URL without “www”Example) http://www.abc.com (X)https://abc.com (O)3. Select the “HTML Meta Tag” and click the Copy button at the HTML tag4. Open the Creatorlink site with a new tab5. Click the Register button at the Marketing > For Search Engines > Bing Webmaster Tools on the dashboard6. Paste the copied value of the content on the box and click the OK button(Please use your own values of the meta tag and do not use the values on the image as they are just sample.)7. Go back to the Bing webmaster tools page and then click the VERIFY button at the HTML Meta TagAfter complete to verify your website, you also need to submit the sitemap to the webmaster tools.[How to submit the sitemap]1. Click the Sitemaps menu2. Click the Submit sitemap button on the Sitemaps menu3. Type the “https://URL/user-sitemap” in the box and click the Submit buttonExample) If the URL is “https://supportcenter.creatorlink.net”, type the “https://supportcenter.creatorlink.net/user-sitemap”* You can find your sitemap URL at the Marketing > For Search Engine > Sitemap URL in the Creatorlink dashboard.4. Sitemap has been submittedNote* It might take a maximum of 14 days to get your site from the Bing search result.* By search with “site: URL”, you can check whether your site is indexed or not indexed by the Bing search engine* Edit the meta tag or add webmaster tools on your site are premium features. So, if your plan has changed to the free plan, some of the meta tags are replaced with the default text and webmaster tools are disabled. But when you upgrade to the premium plan again, it will restore your data, and able to use the webmaster tools* Please note that the portal site does not guarantee to index all registered site as the search engine algorism filtered the lower quality of the contents or as their policy* If you have more questions about the webmaster tools or about searching on the Bing, please ask via Bing customer center
-
QHow to submit your website to Daum Webmaster Tools
-
A 1. Go to Daum Webmaster tools2. Click the Get a PIN code3. Enter your site URL and Pin code* The Pin code is the same as the password.4. Check on the agree to terms and conditions5. Click the Copy to the clipboard to copy the Authentication key6. Go to the Creatorlink > Marketing > For Search Engines and paste the Authentication key on the Daum Webmaster Tools7. Go back to the Daum webmaster tools and enter your site URL and Pin code to confirm your site.
-
QI can’t verify my site when register to the webmaster tools.
-
AThere are several cases that the webmaster tools can’t verify your site.1. When the domain connection is unstable.When you connect your custom domain and change the nameservers, it takes almost 48 hours to make connections stable. So, make sure your domain nameservers have been changed and try it after 48 hours since you change the nameservers. Also, if you connect the domain with forwarding, the webmaster tools cannot recognize your domain has been connected properly, neither.2. When you register the custom domain with “Http://” or “www.”- The custom domain that connected to the Creatorlink site only supports the “https://”, So webmaster tools cannot recognize the custom domain that with “HTTP://”.- Every domain that provides from Creatorlink and connected custom domain does not support the URL with “www”. You can access your site with “www.+ your domain address” as we redirect to the domain address that does not have “www”. Therefore, webmaster tools cannot recognize the domain address with “www.”.Example)https://creatorlink.net (O)http://creatorlink.net (X)https://www.creatorlink.net (X)
-
QHow do I apply the same meta tags to all pages?
-
AYou can apply the same meta tags contents to all of the pages using the Apply to All Pages button.* The Apply to All Pages button is available for the premium plans and multipage style.1. Click the Advanced > Basic Info > Meta Tag Edit icon2. Edit the contents of the meta tags3. Click the Apply to all pages button4. Click the Save button
-
QHow do I undo the meta tags?
-
AYou cannot undo the meta tags so please think carefully when you change the meta tags.So please think carefully when you save the meta tags after the change.
-
QHow to change the Title of the site.
-
A 1. Click the Advnaced > Basic Info > Browser Title Edit icon2. Edit the Title3. Click the Save button* You can change each page of the title by using the Meta tag* You can apply the same meta tags information to all pages by clicking the Apply to All Pages on the Meta Tags window.* If you already share your site URL through SNS, the information may take time to be updated to the new information depending on the SNS server.
-
QHow do I use RSS for the site?
- AUnfortunately, Creatorlink does not support the RSS feature. If you need RSS for the webmaster tools, please do not worry about the RSS as it is not a necessary feature for the webmaster tools.
-
QHow do I use Google Analytics for my site?
-
AYou can register Google Analytics to your site by adding Tracking ID.1. Go to Google Analytics2. Create an account and get your tracking ID3. Go to Creatorlink site and sign in.4. Click the Marketing > Analytics > Google Analytics Register.5. Enter the Tracking ID6. Click the Save button
-
Q How do I use the Naver Analytics for my site?
-
AYou can register Naver Analytics to your site by adding Naver Analytics ID.1. Go to Naver Analytics2. Register your Site to Naver Analytics.3. Create an account and get your Naver Analtyics ID4. Go to Creatorlink site and sign in.5. Click the Marketing > Analytics > Google Analytics Register.6. Enter the Tracking ID7. Click the Save button
-
Q What is the Facebook Pixel?
-
AThe Facebook pixel is a piece of code for your website that enables you to measure, optimize and build audiences for your Facebook ad campaigns.
-
QHow do I use the Facebook Pixel on my site?
-
A 1. Sign in to your Facebook account.2. Go to Facebook Pixel tab in Ads Manager.* You can also go to Facebook Pixel tab by clicking [Assets] > [Pixels] menu in the Ads Manager.3. Click Create a Pixel button4. Enter a name for your pixel and click Next button.5. Click Copy and Paste the Code option.6. Click Email Instructions button at the right bottom of Install Pixel window7. Copy the Facebook Pixel ID8. Close the Email Pixel Code window9. Go to Creatorlink.net and sign in with your account10. Click Marketing > Analytics > Facebook Pixel Register11. Enter your Facebook Pixel ID12. Click the Register button13. Check your pixel data at the Facebook Pixel page.* You may able to check your data after a day from the date that you register the Facebook Pixel ID at your Facebook Pixel page.
-
QHow do I change the social sharing image that when I share my site URL through social media?
-
AYou can use the site's first-page screenshot image as the social sharing image, or you can upload the image for the social sharing image. [Change the social sharing image at the preview image on the admin page]1. Move the cursor over the preview image on the top side of the admin page2. Click the social sharing image button3-1. Select the Site Screenshot option and click the Update button to use the site screenshot as the social sharing image3-2. Select the Image File option and upload the image for the social sharing image[Change the social sharing image at the advanced tab on the admin page]1. Click the Advanced tab on the admin page2. Click the Edit icon at the Basic Info > Social Sharing Image3-1. Select the Site Screenshot option and click the Update button to use the site screenshot as the social sharing image3-2. Select the Image File option and upload the image for the social sharing image


도메인
-
QHow do I know my website domain address?
-
A You can check your site domain address at the top side of the dashboard.If you have connected the domain, the domain address will be shown instead of the Creatorlink free domain address.
-
QHow do I change the free Creatorlink domain address?
-
AThe domain address that Creatorlink provides for free cannot be changed. So please think carefully when you create the Free Creatorlink domain.* If you connect the custom domain to your Creatorlink website, the Creatorlink site uses the connected domain as the main domain.
-
QWhat is the Connect a Domain?
-
AIf you have your own domain(e.g., www.sitename.com), you can connect the domain to your Creatorlink website(siteid.creatorlink.net). You can access your site with a connected domain URL, and you can also access your site with your Creatorlink domain URL.* Creatorlink does not sell the domain yet. So you need to purchase a domain from a domain provider like GoDaddy, Whois, and others.
-
QHow can I connect my domain?
-
A 1. Choose a site which is using a Premium plan.2. Click ‘Connect a Domain’ button next to the Site URL
 3. Enter the domain and click ‘connect’ button.
 4. You will get 4 nameservers.
 5. Login to your domain provider website.6. Add provided 4 nameservers to your domain.* It may take maximum 48 hours to connect domain.* Please note that if your premium plan expires, your domain connection will also be disconnected.
 -
QHow can I register MX Records to use email with custom domain?
-
AYou can customize your email address by using your own domain.To do this, you may need to connect your domain and email service.When you set up the business email service from Gmail, Icloud, Hotmail, Naver Works, Daum Smart Work or more, you will get MX Records. Give us your MX Records and domain information and ask us to connect the MX Records with registered domain via 1:1 inquiry.We will connect the MX Records with your domain for you. It will take a maximum 48 hours to take effect.
-
QHow do I connect the Korean character domain?
-
A Unlike general English domains, Korean domains can be connected after converting them to Punycode format.1. Go to 한국인터넷정보센터.한국2. Enter the Korean character domain without “https://”e.g.) https://크리에이터링크.com (X) / 크리에이터링크.com (O)3. Copy the puny code from Output4. Click the Connect a Domain button on the Creatorlink dashboard5. Paste the copied puny code on the URL input box6. Click the Create button7. Check the provided nameservers8. Change your domain’s nameservers to the provided nameservers* If the domain provider requests the IP address for the nameservers, copy and paste the provided IP addresses.* After changing the nameservers, it may take 48 hours to take effect.
-
QAre there any other ways to connect a domain other than changing the nameserver?
-
AYou can only connect the domain to your Creatorlink website by changing the nameservers.Check that your domain provider allows you to change the nameservers for your domain before connecting your domain.
-
QHow do I apply the SSL certificates(https://) to my domain?
-
ACreatorlink provides the SSL certificates to all connected domains include free Creatorlink domains for free.The SSL certificates are applied when you connect the domain with your Creatorlink website. So you can use the domain with "https://" within 48 hours.
-
QI can’t access my website with my domain.
-
A1. Nameservers have not changedIf you do not change your domain nameservers to the Creatorlink’s nameservers provided when you connect the domain, the domain is not connected properly. In this case, please change your domain nameserver to Creatorlink’s nameservers. You can change the domain nameservers at the domain providers.2. Not applied the SSL(Https://)If you see the following page when you access the site with a connected domain, the SSL(Https://) is not connected yet.The SSL is applied within 48 hours of in-office hours after the nameservers have been changed. If you still cannot connect the domain with SSL(Https://), please check your domain via a 1:1 inquiry.Premium plan has been expiredTo connect the custom domain requires the premium plan. When your premium plan has expired, the page shows the following page instead of accessing the site.As soon as you apply the premium plan again, your domain is connected immediately without additional work.
-
QHow do I use another URL address instead of the menu name?
-
ACreatorlink website uses the menu name as the menu URL address. So you cannot use another URL address instead of the menu name.e.g.) If the menu name is “portfolio,” the URL address is “abcd.creatorlink.net/portfolio.You cannot change the “portfolio” menu URL address to “abcd.creatorlink.net/gallery.”


회원가입
-
QCan I set up a membership for my site?
-
AYes, you can set up the membership by upgrading to the Business plan.For more information about the business plan, please refer to the following URL.
-
QWhere can I set up the membership for the site?
-
AIf you have upgraded your site to a higher than the Business plan, you can move to the membership setup page in two ways.1. Click the Manage Members on the admin page2. In the Edit mode, you can move to the Membership setup page by clicking the Site Settings > Login/Register Edit icon
-
QHow do I approve the members?
-
AYou can approve the members in two ways.Automatic: Automatically approve the members when they joinedManual: Manually approve the members at the Requests menu.1. Click the Manage Members > Requests on the admin page2. Click the Approve/Deny button on the Action field
-
QWhat is CAPTCHA?
- AA CAPTCHA (Completely Automated Public Turing test to tell Computers and Humans Apart) is a program intended to distinguish human from machine input, typically as a way of thwarting spam and automated data extraction from websites. For your website security, we recommend you use the CAPTCHA for member registration.
-
Q How do I use the CAPTCHA for member registration?
-
A1. Click the Manage Members > Register on the Admin page2. Turn on the Captcha
-
QHow do I modify the registration form for the member registration page?
-
AYou can add more registration items to acquire the member data at the Manage Members > Register > Registration Form on the admin page.The Business plan registration form required the ID, Password, Email, and Nickname. Please note that required items are not able to edit.
-
QShould I have the Privacy Policy and Terms of Use?
-
AIf you provide the service with your website, you must have "Terms of Use" on your website. When a dispute arises, the “Terms of Use” is essential as it is the basis of the judgment. Also, if your site handles the personal information, you should provide the information and acquire the agreement on how you gather, uses, discloses, and manages the personal information data. It fulfills a legal requirement to protect a customer or client's privacy.
-
QHow do I edit the Terms of Service and Privacy Policy?
-
AIf you are using the membership, you can edit the Terms of Service and Privacy Policy on the Manage Members > Register menu.1. Click the Manage Members > Register on the admin page2. Edit the Terms of Use or Privacy Policy* Creatorlink provides a sample of the Terms of Use and Privacy Policy.* If you want to roll back to sample text, delete all text in the box, save the change, and refresh the page.
-
QHow do I create a Privacy Policy menu and Terms of Use menu on my website?
-
AIf you are using the membership registration feature, the Privacy Policy and Terms of Use are required. When you use the membership, the Privacy Policy and Terms of Use pages are automatically created.Please follow the steps to add the Privacy Policy menu and Terms of Use menu on your website.1. Go to Edit mode2. Move to footer3. Type the “Privacy Policy” and “Terms of Use” on the text area of the footer4. Select the “Privacy Policy” text.5. Click the Link icon in the Text Editor.6. Enter the following URL on the URL field - /siteinfo/terms7. Click the OK button to apply.8. Select the “Terms of Use” text.9. Click the Link icon in the Text Editor.10. Enter the following URL on the URL field - /siteinfo/privacy11. Check on the Open in a new window option12. Click the OK button to apply.
-
QHow do I block the member?
-
AYou can block the member(s) at the Member List menu on the Manage Members page.1. Click the Manage Members > Member List on the admin page2. Select the member(s) that you wish to be blocked3. Click the Block button4. Click the OK button on the Block confirm windowYou can check the blocked members on the Block menu.
-
QHow do I unblock the blocked member?
-
AYou can unblock the blocked members on the Blocklist.1. Click the Manage Members > Blocklist on the admin page2. Click the Unblock button
-
QHow does site member can delete their membership from the site?
-
AThere are two ways to delete a member account.[Delete a member account on the Member My Page]1. Sign in to the website2. Click the My Account on the menu3. Click the Delete My Account button4. After checking the instructions, check the agreement5. Click the OK button6. Enter your password7. Click the Delete Account button[Delete a member account by admin]1. Click the manage Members > Member List on the admin page2. Select the members on the list3. Click the Delete button4. Click the Ok button
-
Q Can a user create a new account with deleted account information?
-
AOnce the account has been deleted, the deleted ID and email address are not re-usable.If you want to recover or make it reusable with deleted ID and email address, please request Creatorlink 1:1 inquiry.
-
QHow do I download the member list as an Excel file?
-
A1. Click the Manage Members > Member List on the admin page2. Click the Excel button
-
QWhat is member level?
-
AAdministrators can set levels 1-10 for members. The new member will start with level 1.Member level can be used when using the Site Members Only option, which allows access only to members of a certain level or higher in the Page Permission setting of the menu.[How to set up the member level]1. Click the Manage Members > Member List on the admin page2. Change the Level of the member
-
QHow do I edit the columns of the member list table?
-
A1. Click the Manage Members > Member List on the admin page2. Click the Filter button3. Select the items4. Click the Apply button
다국어
-
Q What is the Multilingual Websites function?
-
AThe multilingual websites function refers to the ability to support multiple language websites with the same address.For example, if you need Korean and English sites for globalization in the same service, you can set up Korean and English sites using the Multilingual Websites function. Then, Korean and English sites exist in the same site address, so you can individually edit and apply the site for each language.
-
QHow can I add the Multilingual Websites?
-
A Multilingual Websites function is available by applying a premium plan to the site. The multilingual website function is a function that allows you to use the website in multiple languages with the same address. Since the multilingual website feature does not provide an automatic translation, you need to change the text according to the language you set after switching to the site in the corresponding language in the edit mode. We recommend that you add a multilingual site after completing the default language site for more convenient work.1. Click Advanced on the Admin page.2. Turn on the Multilingual Websites.3. Choose and apply the default language.4. Click the Add Language.5. Choose and apply the language you want to add.6. Go to the edit mode and check the language option is available on the menu block.
-
QHow many languages are multilingual supported?
-
AMultilingual supports a total of 17 languages and the following languages are supported.English, 한국어(Korean), 日本語 (Japanese) , 中國語 (Chinese), Español (Spanish), Français (French), Deutsch (Germany), Русский (Russian), العربية (Arabic), Português (Portuguese), हिन्दी (Hindi), Italiano (Italian), Tiếng Việt (Vietnamese), Монгол (Mongolian), Orang indonesia(Indonesian), Türkçe(Turkish)
-
QHow can I change the order of the multilingual websites?
-
AUnfortunately, you cannot re-order the multilingual websites.So please think carefully when you add a multilingual website.
-
QDoes the multilingual websites function provide an automatic translation?
-
ACreatorlink’s multilingual websites function does not provide an automatic translation.After adding a multilingual website, you need to change the text to the translated text.
쇼핑
-
Q쇼핑몰 이용 가이드(Korean ver. Only)
-
A

-
Q쇼핑몰 상품은 어떻게 등록하나요?(Korean ver. Only)
-
A
쇼핑몰 상품은 갤러리/쇼핑 블럭을 이용하여 등록할 수 있습니다.
1. 갤러리 블럭을 쇼핑형으로 추가
2. 갤러리 블럭 우측 상단 설정 아이콘 클릭
3. 컨텐츠 관리 버튼 클릭
4. 추가 + 버튼 클릭
5. 이미지 영역을 클릭
6. 상품 이미지를 등록
7. 상품 정보를 입력 및 설정
8. 저장 버튼 클릭
* 게시된 싸이트에 갤러리 블럭이 존재하는 경우, 저장 시 새로 추가한 상품 및 수정된 내용이 실시간으로 홈페이지에 반영됩니다.
* 수정한 상품정보는 되돌리기 기능이 적용되지 않습니다.
* 갤러리 유형이 쇼핑 유형으로 선택되어 있어야 합니다.
-
Q기존에 등록한 갤러리를 쇼핑형 타입으로 어떻게 변경하나요?(Korean ver. Only)
-
A
갤러리 블럭 설정에서 갤러리 타입 변경 가능합니다.
1. 갤러리 블럭 우측 상단 설정 아이콘 클릭.
2. 갤러리 타입을 쇼핑형으로 선택.
-
Q등록한 상품의 정보는 어떻게 수정하나요?(Korean ver. Only)
-
A
상품 편집 페이지로 접속하는 방법은 3가지가 있습니다.
1. 썸네일에 마우스를 오버했을 때 나타나는 EDIT 아이콘을 클릭하여 상품 편집으로 이동
2. 블럭 설정에서 컨텐츠관리에 접속하여 편집 버튼 클릭하여 상품 편집으로 이동
3. 상품 상세 페이지에서 상품 정보 오른쪽 상단 설정 아이콘을 클릭하여 상품 편집으로 이동
-
Q상품 상세페이지는 어디서 편집을 하나요?(Korean ver. Only)
-
A
1-1. 갤러리 리스트에서 썸네일 클릭
1-2. 상품 편집 창에서 상세페이지 편집 버튼 클릭
2. 상세 페이지에서 원하는 블럭들을 추가하여 상품 상세페이지를 꾸며줍니다.
* 기존 갤러리 블럭의 상세페이지 유형과 동일한 방식입니다.
* 상세페이지 유형에서 쇼핑 유형으로 변경한 경우, 상품 설정을 해주어야 기존 블럭들이 보여집니다.
-
Q상세페이지 유형에서 추가한 상세페이지 블럭들이 상품 유형으로 변경 후에는 보이지 않아요.(Korean ver. Only)
- A상세페이지 유형에서 상품 유형으로 변경하게 되면 상품 정보가 설정되어 있지 않아 상세페이지의 블럭들이 보이지 않습니다. 상품 정보를 설정하면 숨겨진 블럭들이 보여지고 상세페이지도 편집이 가능합니다.
-
Q등록한 상품의 옵션 순서는 어떻게 변경하나요?(Korean ver. Only)
-
A
1. 상품 편집 페이지로 이동
2. 옵션 우측의 이동 아이콘을 클릭
3. 옵션을 원하는 위치로 드래그 하여 배치
-
Q등록한 상품의 옵션명과 옵션 가격을 어떻게 변경하나요?(Korean ver. Only)
-
A
1. 상품 편집 페이지로 이동.
2. 옵션의 수정할 옵션명 또는 가격 영역을 클릭.
3. 원하는 옵션명 또는 가격을 입력.
-
Q등록한 상품의 옵션은 어떻게 삭제하나요?(Korean ver. Only)
-
A
1. 상품 편집 페이지로 이동.
2. 삭제할 옵션 클릭.
3. 가격정보 오른쪽 휴지통 아이콘 클릭.
4. 삭제 안내 창에서 확인 클릭.
* 옵션 삭제 시 되돌리기가 불가능하니 주의해주세요.
* 다운로드 상품을 판매하는 경우 구매자들이 파일을 아직 다운받을 수 있는 상태가 남아 있는 경우 파일 또는 옵션을 삭제할 수 없습니다.
-
Q결제 설정은 어떻게 하나요?(Korean ver. Only)
-
A
관리자 페이지의 쇼핑 메뉴에서 설정이 가능합니다
1. 관리자 페이지에서 쇼핑 > 쇼핑 설정 클릭.
2. 쇼핑 환경 설정에서 법적 필수정보/결제/배송 각각의 정보를 입력 후 저장.
* 결제 및 배송 정보 등을 모두 설정해 주셔야 결제가 가능합니다.
-
Q결제 방법은 어떤 것들이 있나요?(Korean ver. Only)
- A결제 방법은 신용카드, 계좌이체(에스크로), 가상계좌, 휴대폰 결제, 무통장입금 총 5가지로 제공됩니다.
-
Q결제 방법 중 신용카드나 계좌이체 등을 이용하려면 어떻게 해야 하나요?(Korean ver. Only)
-
A
신용카드, 계좌이체(에스크로), 가상계좌, 휴대폰 결제의 경우 전자결제(PG) 서비스에 가입 후 발급된 KEY값을 적용해주어야 이용이 가능합니다.
1. 관리자 페이지에서 쇼핑 > 환경 설정 > 결제 클릭
2. 전자결제 서비스 신청하기 버튼 클릭
3. 서비스 기본사항과 가입절차 확인 후 KCP 전자 결제 서비스 신청 버튼 클릭
4. 사업자 정보 입력 후 작성완료 버튼 클릭
* 작성 완료 후 KCP 담당자가 별도로 연락이 가며 승인까지는 2~3주 정도 소요될 수 있습니다.
5. 승인 후 발급된 Site Code 값과 Site Key 값을 전자결제(PG)설정 키값 입력 항목에 입력
6. 입력 정보 확인 후 변경사항 저장 버튼 클릭
7. 원하는 결제수단을 설정 후 저장 버튼 클릭
-
Q휴대폰 결제 이용하려면 어떻게 해야 하나요?(Korean ver. Only)
- A휴대폰 결제를 이용하기 위해서는 별도로 KCP 관리자 페이지에서 고객센터 > 서비스 변경 및 추가 > 결제수단 변경 및 추가 > 휴대폰에서 서비스 신청을 해주어야 합니다. 휴대폰 서비스는 별도의 가입비 10만원이 발생하니 참고해주시기 바랍니다.
-
QPG사 수수료 및 가입비는 어떻게 되나요?(Korean ver. Only)
-
A
PG사 : KCP(NHN한국사이버결제)
가입비 : 220,000원(부가세 포함) / 쇼핑 요금제 1년 이상 시 면제
연회비 : 없음
신용카드: 3.3%(카드사 수수료 포함, VAT 별도)
계좌이체: 가입비 무료, 실시간 계좌이체 1.8% 외 추가 수수료 없음 (VAT 별도)
휴대폰 결제: 별도 가입필요 (가입비 10만원(VAT 별도), 실물 3.5%, 컨텐츠 7%, VAT 별도)
정산주기: 월 4회 정산 (정산 지급일이 토/일/공휴일인 경우 다음날 지급)
-
QPG 가입 절차 PART.1 (업종확인 ~ 상점준비)(Korean ver. Only)
-
A
PG 가입 절차 PART.1 (업종확인 ~ 상점준비)
0단계 : 심사불가업종 확인
- 카드사별 심사불가 업종을 확인합니다. (확인하러 가기)
1단계 : 상점준비
- 홈페이지는 쇼핑몰로서 최소한의 디자인을 갖춰야 합니다.
- 홈페이지 생성 후, 상품을 3개 이상 등록합니다.
- 상품 상세 페이지에는 배송정보, 환불규정이 기재되어야 합니다.
1. 상품 상세 페이지의 빈 영역을 클릭해 블럭을 추가합니다. (텍스트 블럭을 추천합니다.)
2. 텍스트 블럭에 배송정보와 교환/환불규정을 적어 넣습니다. (하기 이미지 참고.)
- 법적 필수정보를 모두 입력합니다. [관리자 페이지 > 쇼핑 > 쇼핑설정 > 법적 필수정보]
* 사업자 등록번호 : 사업자 등록 과정을 거치면 사업자 등록번호를 받아보실 수 있습니다. (국세청 사업자 등록 안내)
* 통신판매업 신고번호 : 사업장 관할 구청 또는 온라인(정부24)으로 통신판매 신청 시 온라인 상거래가 가능합니다. 4단계에서 확인하실 수 있기 때문에 지금 단계에서는 입력하지 않으셔도 됩니다.
* 통신판매사업자 상세조회 링크 주소 : 사업자에 대한 상세 정보를 볼 수 있는 링크입니다. 사업자 등록번호를 입력하면 자동으로 링크가 생성됩니다.
* 대표전화 : 사업장에서 이용하시는 전화번호를 입력하시면 됩니다. 개인 휴대전화 번호는 사용하실 수 없습니다.
* 법적 필수정보는 입력 후 저장하기 버튼을 클릭하면 홈페이지 푸터에 자동으로 입력됩니다.
- 결제 정보를 입력합니다. [관리자 페이지 > 쇼핑 > 쇼핑설정 > 결제]
* 전자결제(PG) 설정 : 전자결제(PG) 서비스 신청하는 방법은 2단계를 참조합니다.
* 사용할 결제 수단 : 상품 판매시 사용할 결제수단을 선택합니다.
* 과세 유형 : PG사에 신청한 과세 유형으로 선택합니다.
* 비회원 구매 : 비회원으로 구매 가능여부를 선택합니다.(PG사 승인을 받기 위해 [사용]으로 체크합니다.)
- 배송 정보를 입력합니다. [관리자 페이지 > 쇼핑 > 쇼핑설정 > 배송]
* 택배회사 : 상품 운송을 담당할 택배 업체를 선택합니다.
* 배송비 : 기본 배송비를 입력합니다.
* 도서산간지역 추가 배송비 : 도서산간지역 배송 시 추가될 배송비를 입력합니다.
* 배송비 무료조건 : 배송비 무료조건 설정 사용여부 및 최소 구매 금액을 입력합니다.
- 이용약관, 개인정보 처리방침을 입력합니다. [관리자 페이지 > 상세설정 > 부가기능 > 회원가입]
-
QPG 가입 절차 PART02 (PG 신청 ~ 심사)(Korean ver. Only)
-
A
2단계 : PG 이용 신청
- PG 신청시 필요한 서류는 다음과 같습니다.
- 관리자 페이지 > 쇼핑 > 쇼핑설정 > 결제 메뉴에서 전자결제 서비스 신청하기 버튼을 통해 온라인 신청서를 제출합니다.
1. 서비스 기본사항과 가입절차 확인 후 KCP 전자 결제 서비스 신청 버튼 클릭
2. 사업자 정보 입력 후 작성완료 버튼 클릭
- 판매 상품이 비과세 또는 복합과세(과세 + 비과세)인 경우 별도로 기타사항에 명시해 주셔야 합니다.
- 신청이 완료되면 2~3 영업일 중 PG 담당자가 연락드립니다.
(접수 이후의 진행 상황은 KCP 고객센터로 문의하시면 정확한 답변을 받으실 수 있습니다.)
3단계 : 심사
- 심사는 통상 2~3주가 소요됩니다. (카드사 심사 중엔 결제해도 과금되지 않습니다.)
- 심사가 완료되면 상점 ID 및 키 값을 메일로 전달받습니다.
- 해당 키 값을 관리자 페이지 > 쇼핑 > 쇼핑설정 > 결제 메뉴에서 키값 입력란에 입력합니다.
1. 심사 완료 후 전달받은 안내 메일의 SITE CODE와 SITE KEY를 확인합니다.
2. 쇼핑 > 설정 > 결제 메뉴로 이동하여, 키 값 입력란에 SITE CODE와 SITE KEY 값을 각각 입력합니다.
3. 저장 버튼을 클릭하여 저장합니다.
-
QPG 가입 절차 PART03 (통신판매업 신고)(Korean ver. Only)
-
A
4단계 : 통신판매업 신고
통신판매업 신고 시 필요한 정보를 확인합니다.
신고 방법은 온라인 신고, 지역 공공기관에 방문 신고 두가지 방법이 있습니다.
o 온라인 신고 절차
1. 정부24 홈페이지에 접속하여 로그인 합니다.
2. 신청하기 버튼을 클릭합니다.
3. 필요한 정보들을 모두 작성 후 민원신청하기 버튼을 눌러 신청합니다.
* [신고증 수령기관]은 추후에 신고증 수령을 위해 방문해야 할 공공기관을 의미합니다.
o 지역 공공기관에 방문 신고
1. 신고 관련 서류를 지참하여 구청에 직접 방문합니다.
온라인 등록 또는 직접 방문 중 한가지 방법으로 신청 후, 4~5일 후 신고증 수령기관에 방문하여 면허세 40,500원을 납부하시면 통신판매업 신고증을 수령하실 수 있습니다.
-
Q네이버 아이디 로그인 설정 방법(Korean ver. Only)
-
A
1단계 : 네이버 개발자 센터 등록
1. 네이버 개발자 센터에 접속.
2. 우측 상단의 로그인 버튼을 눌러 네이버 계정으로 로그인.
2단계 : 네이버 아이디로 로그인 API 신청
1. 상단 메뉴에서 Products > 네이버 아이디로 로그인 > 네이버 아이디로 로그인 API 메뉴를 클릭.
2. 하단의 오픈 API 이용 신청 버튼을 클릭.
3단계 : 네이버 아이디로 로그인 API 정보입력
1. 사이트 이름을 입력.
2. 네아로(네이버 아이디로 로그인)을 선택.
3. 회원이름, 이메일, 별명, 프로필 사진, 성별 중 사이트에 필요한 요소들을 필수 항목으로 체크.
(생일, 연령대는 지원하지 않습니다.)
4. 로그인 오픈 API 서비스 환경은 PC웹을 선택.
5. PC 웹의 서비스 URL에는 사이트의 대표 도메인(예시 : https://etc.creatorlink.net)을 입력.
6. 네이버 아이디로 로그인 Callblack URL에는(예시 : https://etc.creatorlink.net/oauth)을 입력.
7. 등록하기 버튼 클릭.
4단계 : Client ID 및 Client Secret 입력
1. Client ID 항목을 복사하여 크리에이터링크 설정창에 입력.
2. Client Secret 항목을 복사하여 크리에이터링크 설정창에 입력.
5단계 : 로고 이미지 등록, 개발상태 변경
1. 내 애플리케이션에서 API 설정 탭 클릭.
2. 로그인 오픈 API 서비스 환경에서 로고 이미지를 등록(필수).
3. 페이지 하단의 확인 버튼을 눌러 반영.
4. 중요: 애플리케이션 개발 상태에서 네아로 검수 요청을 클릭.
6단계 : 검수 요청하기
1. 검수 요청 가이드 확인에 체크
2. 첨부파일 항목은 네이버 로그인이 적용된 실제 사이트 화면을 직접 캡처하여 첨부파일 업로드 후 첨부여부 옵션 체크
3. 네이버 아이디로 로그인을 통한 신규 회원 가입 적용에 체크.
4. 네아로를 이용하여 가입하는 과정을 캡처하여 첨부파일 업로드
5. 추가 제출 서류 확인에서 해당하는 항목을 선택
6. 검수요청 버튼 클릭
검수는 며칠이 소요될 수 있으며 검수가 완료되면 제한 없이 이용이 가능합니다.
-
Q카카오 아이디 로그인 설정 방법(Korean ver. Only)
-
A
[앱 만들기]
1. 카카오 디벨로퍼스에 접속한 뒤, 로그인 버튼을 클릭하여 카카오 계정으로 로그인.
2. 약관 동의 및 이름을 입력한 뒤 회원가입 버튼을 클릭.
3. 상단 메뉴의 내 애플리케이션 버튼을 클릭.
4. 내 애플리케이션 추가하기 버튼을 클릭.
5. 앱 이름과 회사 이름을 입력한 뒤 저장 버튼을 클릭해 주세요.
[앱 설정]
1. 생성된 애플리케이션을 클릭.
2. 플랫폼 설정하기 버튼을 클릭.
3. Web 플랫폼 등록 버튼을 클릭.
4. 사이트의 대표 도메인을 입력.
* 이 때, creatorlink 주소인 경우 ‘https’와 ‘http’를 모두 입력하고 외부 도메인은 ‘https’만 입력해 주세요.
(예시 : https://example.creatorlink.net, http://example.creatorlink.net, https://example.com)
5. 메인을 입력한 뒤 저장 버튼을 클릭.
6. 동의항목 메뉴로 이동한 뒤 프로필 정보 항목의 설정 버튼을 클릭.
7. 정보 수집 약관에 체크.
8. 동의 목적란에 ‘회원가입 목적’을 입력.
9. 모든 항목을 입력한 뒤 저장 버튼을 클릭.
10. 카카오 계정의 설정 버튼을 클릭.
11. 동의 단계를 선택 동의로 설정.
12. 정보 수집 약관에 체크.
13. 동의 목적란에 ‘회원가입 목적’을 입력.
14. 모든 항목을 입력한 뒤 저장 버튼을 클릭.
15. 카카오 로그인 메뉴로 이동한 뒤 카카오 로그인 활성화 상태를 ON으로 변경.
[카카오 로그인 활성화]
1. 앱 키 메뉴로 이동한 뒤 네이티브 앱 키와 REST API 키를 복사.
2. 크리에이터링크의 카카오 로그인 설정 항목에서 복사한 네이티브 앱 키와 REST API 키를 붙여넣기.
3. 사용을 선택.
4. 마지막으로 저장 버튼을 클릭해 주시면 카카오 로그인 설정이 완료.
-
Q구글 아이디 로그인 설정 방법(Korean ver. Only)
-
A
1단계 : 구글 API 콘솔 등록
1. 구글 API 콘솔에 접속.
2. 구글 계정으로 로그인.
2단계 : OAuth 클라이언트 ID 만들기
1. 우측의 프로젝트 만들기 버튼을 클릭.
2. 프로젝트 이름을 적고 만들기 버튼 클릭.
3. 사용자 인증 정보를 클릭.
4. Oauth 동의화면 탭을 클릭.
5. 앱 이름과 로고 이미지를 입력.
6. 승인된 도메인: 이용중인 도메인을 입력.
(단, 2차 도메인 설정시에는 1차 도메인을 입력. 예) 123.abc.com -> abc.com을 입력)
7. 애플리케이션 홈페이지 링크 : 이용중인 도메인을 입력합니다.
(2차 도메인의 겨우 2차 도메인 전체를 입력.)
8. 애플리케이션 개인정보처리방침 링크: 내 사이트 주소/siteinfo/privacy
9. 애플리케이션 서비스 약관 링크: 내 사이트 주소/siteinfo/terms
10. 저장 버튼 클릭
11. 사용자인증정보 만들기 버튼을 클릭 후 OAuth 클라이언트 ID를 선택.
12. 웹 어플리케이션 선택.
13. 승인된 리디렉션 URI : 도메인 주소 입력 후 등록
* creatorlink 주소인 경우 http와 https 모두 등록, 연결된 도메인은 https만 등록
예: http://sample.creatorlink.net,
https://sample.creatorlink.net,
https://sample.com
14. 승인된 자바스크립트 원본 : 도메인 주소 뒤에 /oauth를 추가후 등록
* creatorlink 주소인 경우 http와 https 모두 등록, 연결된 도메인은 https만 등록
예: http://sample.creatorlink.net/oauth,
https://sample.creatorlink.net/oauth,
https://sample.com/oauth
15. 생성 버튼을 클릭.
16. 클라이언트 ID와 클라이언트 보안 비밀 항목을 복사하여 크리에이터링크 설정창에 입력.
-
Q배송 정보나 교환/환불 규정을 상품들에 일괄 적용하고 싶어요.(Korean ver. Only)
-
A
배송 정보나 교환/환불 규정 등 모든 상품에 공통적으로 명시되어야 하는 정보들을
고정블럭 기능을 이용하여 일괄 적용할 수 있습니다. (상세페이지형도 이용 가능)
고정블럭 이용 조건
1. 블럭이 최소 2개 이상 존재해야 합니다. (고정 블럭이 있는 경우, 고정 블럭을 제외하고 2개 이상.)
2. 제품 상세 페이지의 제일 상단이나 하단에 위치한 블럭이어야 합니다.
3. 고정 블럭과 인접한 블럭이 있어야 합니다.
-
Q파일 형태의 다운로드 상품(컨텐츠)을 판매하고 싶어요.(Korean ver. Only)
-
A
1. 상품 편집 페이지에 접속.
2. 상품 유형 중 다운로드 상품을 선택.
3. 판매할 파일을 업로드. (최대용량 500 MB)
업로드 가능 확장자 : zip, txt, pdf, docx, xlsx, xls, csv, ppt, pptx, gif, jpg, png, ico, hwp, mp3, wav, mp4
4. 필요에 따라 다운로드 한도(다운로드 횟수, 다운로드 가능 기간)를 설정합니다.
5. 저장 버튼을 눌러 설정 내용을 반영합니다.
다운로드 상품 구매 완료 시 구매자가 마이페이지에서 다운로드 한도 설정에 맞춰 다운받을 수 있습니다.
-
Q무형의 상품을 판매하고 싶어요.(Korean ver. Only)
-
A
수강권, 회원권 등 형태가 없는 무형의 상품을 자유롭게 판매할 수 있으며, 필요에 따라 날짜를 설정할 수 있습니다.
1. 상품 편집 페이지 접속.
2. 상품유형 중 기타무형상품을 선택.
3. 상품에 날짜 옵션이 필요한 경우 기간 설정을 설정으로 선택.
4. 날짜 유형을 비롯한 기타 날짜 옵션들을 설정.
5. 저장 버튼을 눌러 설정 내용을 반영.
-
Q상품에 옵션을 추가하고 싶어요.(Korean ver. Only)
-
A
상품 편집 페이지에서 상품에 대한 옵션과 그에 따른 추가 요금을 설정할 수 있습니다.
1. 상품 편집 페이지에 접속.
2. 옵션 영역의 + 버튼을 눌러 옵션을 추가.
3. 옵션명, 추가금액, 판매 상태 등을 설정.
* 상단의 재고관리를 활성화하면 옵션마다 재고 관리가 가능합니다.
4. 저장 버튼을 눌러 설정 내용을 반영.
-
Q자가배송이나 방문수령인 경우에는 어떻게 배송설정을 해야 하나요?(Korean ver. Only)
- A자가배송이나 방문수령으로 배송하는 경우 쇼핑 > 쇼핑설정 > 배송 > 기본정보에서 택배사 옵션을 자가배송으로 설정하시면 됩니다.
-
Q재고 관리 방법을 알고 싶어요.(Korean ver. Only)
-
A
1. 상품 편집 페이지에 접속.
2. 재고관리 옵션을 활성화.
3. 재고 수량을 입력.
* 옵션을 이용하시는 경우, 각 옵션마다 재고를 기입할 수 있습니다.
* 장바구니에 담거나, 결제 페이지에 진입하는 것으로는 재고가 차감되지 않으며, 실제 결제가 되면 재고가 차감됩니다.
* 무통장입금의 경우 주문이 완료되면 입금 여부와 관계없이 재고가 차감됩니다.
-
Q주문 내역 페이지에 관리자만 볼 수 있는 메모를 남기고 싶어요(Korean ver. Only)
-
A
관리자 페이지의 쇼핑 탭에 있는 주문 내역을 클릭하여 메모를 작성할 수 있습니다.
1. 관리자 페이지 > 쇼핑탭을 클릭.
2. 주문, 취소, 교환, 반품 중 원하는 항목에 들어가 상품을 클릭.
3. 우측 상단에 관리자 메모의 메모 추가를 클릭하여 메모를 작성.
-
Q알림톡 템플릿을 수정할 수 있나요(Korean ver. Only)
- A알림톡 템플릿은 각 상황에 맞게 템플릿이 적용되어 있어 템플릿 내용을 직접 수정하실 수는 없습니다.
-
Q상품정보 제공고시는 어디서 입력할 수 있나요?(Korean ver. Only)
-
A
판매하는 상품의 상품정보 제공고시는 상품 편집 페이지에서 설정하실 수 있습니다.
1. 상품 편집 페이지에 접속.
2. 상품정보 제공고시 옵션을 활성화.
3. 상품의 카테고리를 선택.
4. 상품 정보를 입력.
[이미지_03_상품 정보를 입력한 이미지]
* 상세페이지에 상품정보 제공고시가 포함되어 있는 경우 ‘상세페이지 참조’로 모두 입력 버튼을 클릭하여 일괄적으로 “상세페이지 참조”로 표시할 수 있습니다.
내 정보 관리
-
QHow can I change my ID(Email address)?
-
APlease tell us your current ID(Email address) and your new ID(Email address) through a 1:1 inquiry.* A new ID(Email address) must not a registered in Creatorlink.
-
QHow can I change my profile?
-
AFor account profileYou can change your account profile on the My account page.For profile per siteYou can change your profile for the site at the Advanced tab on your admin page.
-
QHow can I change my account password?
- AYou can change your password on the My account page.
-
QHow can I find my password?
-
A1. Click the Sign In on the right top side of the Creatorlink site.2. Click the Forgot your password.3. Enter your ID(Email address) and security code.4. Click the Reset Password button.The password reset email will be sent to your registered email address.You can check the password reset email and continue to reset your password.
-
QHow can I delete my account?
-
AYou can delete your account on the My account page.Please note that you can restore your account in 72 hours from the time you delete your account.Also, you cannot use the same ID within 30 days from the day you delete your account.
-
QCan I rejoin the site after I delete the account?
-
AYou can use your deleted ID after 30 days from the day you delete your account.If you want to restore your account, please send an email to us(help@creatorlink.net) to restore your account within 72 hours from the time your delete your account.
-
QHow do I change the profile image and nickname per site?
-
A
You can set the default profile information such as image and nickname at the My account.
If you are using the premium plan for your site, you can set the site profile image and nickname separately.
1. Click the Advanced tab on the admin page
2. Click the Edit icon at the Basic Info > Site Profile
3. Set the site profile image or nickname
4. Click the Change button to apply
기타 문의
-
QWhere I can check the update?
-
AYou can check the update through Notice page.We are doing our best to provide your more precious features and service.
-
QHow can I ask you questions?
-
AYou can ask us through 1:1 inquiry, Contact Us, or help@creatorlink.net.Please ask us with details such as site URL, specific location of the problem, your browser, or more when you ask a question.
-
QHow can I offer the partnership with you?
- APlease offer the partnership through help@creatorlink.net or the Partnerships page, which locate on the footer of the site. We will confirm your offer and reply to you. The offer will be used for partnership review purposes only.
-
QHow can I check my browser version?
-
AMostly you can check your browser version at the setting menu on your browser.Chrome1. On your computer, open Chrome.2. At the top right, click More icon.3. Click Help and select About Google Chrome.Internet Explorer1. On your computer, open Internet Explorer.2. In the upper corner of Internet Explorer, select the Tools button.3. Click the About Internet Explorer.Firefox1. On your computer, open Firefox.2. At the top right, click the menu button.3. click Help and select About Firefox
-
QHow can I clear the cache?
-
AIf the service function/UI is updated or errors has been fixed, sometimes the screen may not be displayed normally or the new UI may not be displayed immediately. In this case, the existing data remains in the browser or PC, so it may not be displayed normally. If you delete the browser's Internet cache and cookies and reset it, the problem will be solved.How to clear the browser cache 1Using the Keyboard shortcut.◦ PC (WINDOW) : Ctrl + F5◦ APPLE MAC : CMD + RIf the above method does not work, please use How to clear the browser cache ② to clear your browser cache/cookies.How to clear the browser cache 22-1. Open the Clear browsing data window by pressing the shortcut key (Ctrl+Shift+Del) in your browser.◦ Chrome : Make sure that “Cookies and other site data“ and “Cached images and files” options are checked, and then click the Clear Data button.◦ Internet Explorer : Make sure that “Cached images temporary Internet files” and “Cookies” options are checked, and then click the Delete button◦ Firefox : Make sure that “Cookies” and “Cache” options are checked, and then click the OK button.2-2. Please use following instruction for Safari on the Mac◦ Safari (Mac) : Click the Develop > Empty Caches (Option + Command + E) menu to clear the cache.2. Reload the siteIf you need more help, please feel free to ask us through 1:1 inquiry.
-
QHow can I improve my website loading speed?
-
A There are several reasons that your website getting slow. There are some ways to increase your website speed.1. Reduce Image SizeIf you are using large-size images for your site, your site will get a slow loading time. To improve your loading time, you may reduce the image size by using Photoshop or other graphic editor tools.Recommend: Width: under 1920px, Size: 300~400k1. Run Photoshop2. Import an image3. Click File > Save for Web & Devices (Ctrl + Alt + Shift + S )4. Change Quality value to 80~90.5. Click Save button.If you do not have Photoshop in your computer, you can use below software instead of Photoshop.PIXLR , Photoworks , Alsee2. Use Multi-Page Design for WebsiteOne-page design loads all images at the same time and it makes your website slow.So, if you are using the One-page design for your website and show lots of images, we recommend you to use a multi-page design instead of a one-page design. You can use a multi-page design by disabling the Site Settings > One Page Style option.
-
QHow can I delete the site?
-
A1. Click the Advanced tab on the Admin page2. Click the Delete Site3. Enter the “I Agree” on the input box4. Click the Delete button* Please note that all site resources will be permanently deleted and cannot restore the data.* You cannot delete the site that applied a plan. Please remove or transfer the plan first on the Manage Premium Plans page
-
QHow can I transfer the site to another Creatorlink account?
-
APlease request us to transfer the site to another Creatorlink account through a 1:1 inquiry. The following information is required.- Site ID- Creatorlink account ID to be transferred
-
Q
- A